To edit photos with AI, upload a clear source image, write a prompt that describes one change, state which details should stay, and compare the generated version with the original. If the result misses your goal, revise one part of the instruction and try another version. The workflow below includes a recorded background-edit example. Other suggested prompts are drafts, not claims of tested results.
Prepare your photo and a clear goal
Choose a photo you have the right to use and decide what a successful edit would look like. “A coloring page with large areas for crayons” is a more useful target than “a better image.” Keep the original so you can check both the requested change and any unwanted changes.
Image to Image AI accepts JPG, PNG, WebP and supported iPhone HEIC/HEIF uploads up to 15 MB through its browser photo preparation flow. You can prepare a photo and write a prompt before signing in; generation requires an account and uses 1 credit with GPT Image 2 or 3 with Nano Banana 2 per new image.
Before generating, write down two things:
- Change: the main visual transformation, such as a pencil drawing or a different background.
- Preserve: the two or three details you care about most, such as a pet's markings, a person's pose or a room's windows.
Those instructions guide generation; they do not lock pixels. If you need unchanged pixels outside a selection, a manual editor with masks is a better fit than the general prompt tool in Image to Image AI.
1. Upload the source image
Open the image to image editor, choose your photo and check its preview. Make sure the subject you want edited is visible and the crop includes the features that matter.
For a specialized task, you can begin in photo to coloring page, photo to sketch, or photo to cartoon. These task pages help you start with an appropriate instruction. Use AI room design when you want interior style and room settings instead.
For the worked example, use the cat photo below: it has one visible subject and an indoor background to replace. The source is Stefan van der Walt's CC0 scikit-image sample.
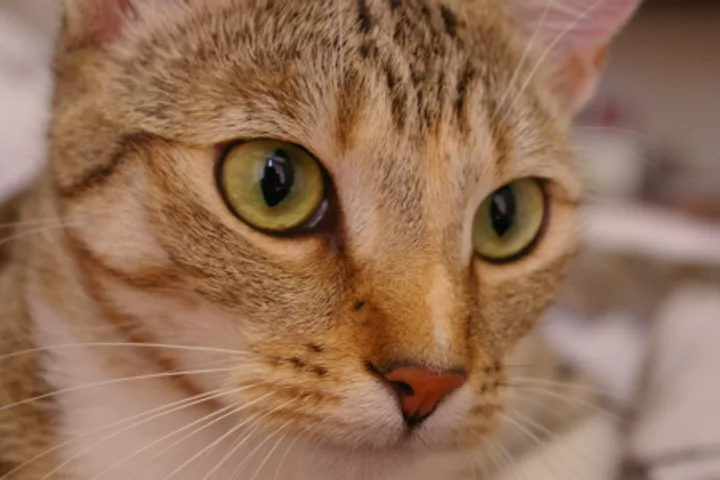
Do not expect an unclear source to prove details that were never visible. A model may invent the hidden lettering on a shirt or the shape of an object behind another object.
2. Describe one change with a visible target
Write what should change, which subject the instruction applies to, and what the result should look like. Black Forest Labs' image-editing documentation demonstrates direct instructions about an object rather than a description of an unrelated new scene.
AI photo edit prompts to start from
These are draft examples to adapt to your own image:
| Your goal | A starting instruction | What to inspect |
|---|---|---|
| Coloring page | Turn this photo into a black-and-white coloring page with bold closed outlines, large open areas and a plain white background. | Closed shapes, leftover shading and tiny details |
| Pencil drawing | Turn this photo into a pencil sketch with light hatching on white paper. | Subject shape, muddy shadows and unwanted background detail |
| Cartoon | Turn this photo into a colorful cartoon with clear outlines and flat colors. | Expression, proportions, markings and framing |
| Background change | Replace the background with a quiet garden in soft daylight. | Subject edges, lighting and invented objects |
In the recorded background edit, the change instruction was “Replace the background with a sunny beach”. This gives you a visible target to check: the indoor background should become a beach.
Choose one row for the first attempt. A prompt that changes the style, pose, clothes, background and lighting at once makes it harder to identify why the result missed your goal.
3. State what should stay the same
Add a short preservation instruction after the requested change. Name the details you will actually check: “keep the head position, coat markings and framing” is easier to evaluate than “keep everything perfect.”
For example, combine the cartoon request with “keep the same pose, expression and original framing.” For a background replacement, request that the foreground subject stays in the same position. The model can still alter those features, so preserve a copy of the source and inspect the output.
The full prompt in the recorded example was: “Replace the background with a sunny beach, keeping the subject exactly as it is”. The preservation clause was a request, not a guarantee.
Use this prompt builder to make a draft for your own photo. Copying a prompt does not submit an image or spend a credit; you will paste it into the editor yourself.
Build your own prompt
Edit the two parts, then copy the draft into the image editor. This writes an instruction; it does not generate an image or guarantee that details stay unchanged.
4. Generate a version and compare it with the original
Sign in if needed, confirm the credit cost shown by the tool, and start generation. When a result is ready, move the before-and-after slider and inspect the areas that were supposed to stay the same.
The recorded example used gpt-image-2 through APIMart on 2026-11-10, with one 3:2 image at the 1K tier. It completed in about 49 seconds including polling and download. This was one submission, with no reroll; it was generated through the API used by the product, not captured from a browser session.
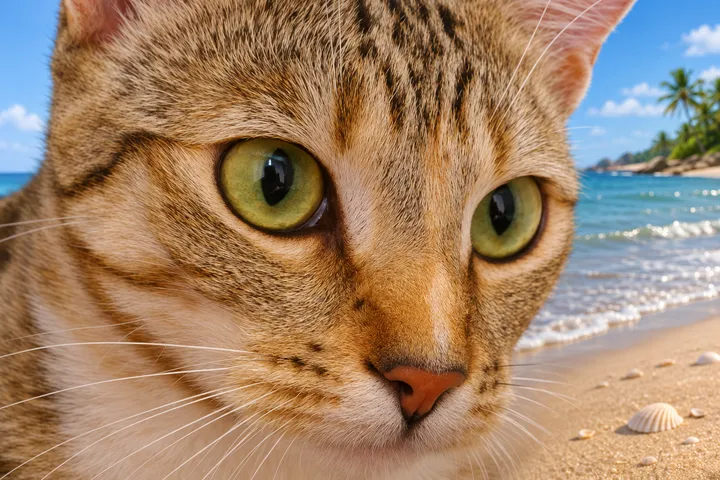
The beach request worked, but the preservation request did not fully work: the cat was redrawn sharper and slightly larger. Compare the subject's framing and fur with the source above. These WebP images are resized display copies; the generation record and original file paths preserve the prompt, license, dimensions and checksums.
A practical review has two separate questions:
- Did the requested change happen? For a coloring page, are there usable open regions? For a cartoon, is the intended illustration style apparent?
- What else changed? Check faces, hands, text, logos, product shapes and background structures where relevant.
Do not judge only from the thumbnail. A clean overall impression can hide an unreadable label or a changed expression. When we tested three AI models on the same photos, two of them kept solid black fills on a coloring page that the prompt had ruled out. A technically completed image that you dislike is still a completed generation and uses a credit.
5. Revise one instruction and download the version you prefer
When something is wrong, name that issue in the next prompt and keep the rest of the request stable. This makes the comparison more informative, although results are still generative and can vary between attempts.
In the general editor, changing the prompt and generating again uses the uploaded source photo. Selecting an earlier version is for comparison; it does not automatically make that result the input for the next edit. If you deliberately want to edit a generated result, download it and upload it as a new source.
For the cat example, a possible next instruction is “Replace only the indoor background with a sunny beach; keep the cat's size, position and fur detail unchanged.” This revision has not been tested. If unchanged subject pixels are essential, use a masked manual edit instead. We kept the first result as evidence of the limitation, rather than claiming a retry fixed it.
Use the versions list to compare completed attempts, then download the result you prefer. Each new generation uses the selected model’s credits; comparing and downloading an existing version do not.
What should you change when a result goes wrong?
Use the visible problem to choose the next instruction. The table below is a troubleshooting plan, not a record of observed success rates or a guarantee that a retry fixes the problem.
| Visible problem | Suggested next instruction | Limit to keep in mind |
|---|---|---|
| Coloring page is too busy | Ask for fewer details, larger closed areas and a simplified background. | Inspect the lines before printing; words do not create a vector file. |
| Sketch has dark solid regions | Ask for light pencil strokes, white paper and reduced shading. | It remains a generated drawing, not a measured tracing. |
| Cartoon no longer resembles the subject | Ask to preserve specific features and reduce changes to pose or expression. | Exact identity is not guaranteed. |
| Background change alters the subject | Name the foreground features to retain and narrow the background request. | Image to Image AI has no mask brush to lock the foreground. |
| Text becomes unreadable | Keep the edit away from text where possible, or add exact text later in a manual editor. | AI-generated lettering needs close inspection. |
If several attempts still change a critical feature, use a conventional editor for that feature. Repeatedly asking for an exact copy does not add a pixel-locking control.
Frequently asked questions
How long should an AI photo editing prompt be?
Start with one or two clear sentences: a requested change and a preservation instruction. The general image editor currently accepts prompts between 3 and 1,000 characters. More words are useful only when they resolve a specific ambiguity.
Where is the strength slider?
Image to Image AI does not currently have one. Some diffusion applications expose a strength control, but those numerical settings do not describe the prompt-based interface of Image to Image AI.
Can I make another version without uploading again?
Yes. Keep the source photo in the editor, change the prompt and generate another version. Each generation uses 1 credit with GPT Image 2 or 3 with Nano Banana 2. Upload again when you want a different source image, including a previously generated image you have chosen to edit further.
How do I edit a photo with AI without changing the face?
Say what must stay in the prompt, for example “keep the face, expression and skin tone exactly as they are”, and change only one thing per attempt. Then drag the comparison slider over the eyes, mouth and hairline. The AI redraws the whole image, so even a careful prompt cannot guarantee an unchanged face; if it keeps changing, edit that photo in a manual editor with a mask instead.
Do I need a different tool for exact print sizes?
Check the downloaded image's dimensions and your printing application's settings. The coloring page tool offers A4 and US Letter print layouts. Choose the same size in your browser print dialog; your browser may also offer Save as PDF. The result remains a raster image, with no guaranteed print DPI or vector conversion. Check the print preview for framing and line visibility before making several copies.
Choose your next step
Try one small change in the general photo editor. If you want background on the method, read what image to image AI means and the three-model test with recorded limitations. For an outline-focused result, start with photo to coloring page and inspect the generated shapes before printing.
Read more
Image to Image AI Test: 3 Models on the Same Photos
Our image to image AI test ran Flux Kontext Pro, Nano Banana 2 and GPT Image 2 on the same 3 photos. See every output, cost, timing and flaw.
What Is Image to Image AI? A Practical Guide
What is image to image AI? Learn how it edits a photo you already have, how it differs from text to image and filters, and how to start with a prompt.